Which is better tile or. Porcelain stoneware or ceramic tiles, which is better and how they differ. Does porcelain stoneware have disadvantages
Every host country house or dacha dreams of his own bath. Any construction begins with laying the foundation, because it is it that must take on the entire load from the weight of the structure. It is not difficult to make a foundation for a bath with your own hands; you can save a lot on this part of the building. After all, the construction of the foundation already costs the owner 40% of the cost of the entire bath.
How to build the foundations for a bath with your own hands with step-by-step instructions, photos and videos will be shown in this article.
Where to start work
Regardless of what type of foundation will be chosen for the construction of a bath, first of all, you need to prepare a site for construction.
All the stumps are uprooted from the ground, large stones are removed, and other debris is removed. It is better to mow or pull out the grass in the area so that there are no roots and stems left. Then all the sod - the top layer of the soil - is removed from the site and removed to the side.
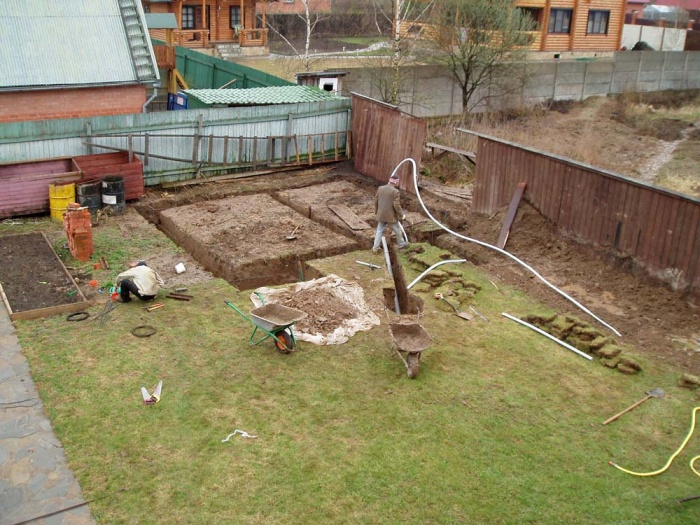
Now you need to make the markup. To do this, use metal rods, such as fittings, and a strong inelastic rope. The most important thing in this step is to postpone the right angle. This can be done with a large construction square or improvised means.
Important! Each side of the foundation should be 5-10 cm larger than the intended perimeter of the building.
Choosing the type of foundation
You can determine which base is more suitable for a particular bath based on several factors:
- depth of groundwater;
- the type of soil on the site;
- depth of freezing of the earth in winter time of the year;
- building material;
- bath area.
A step-by-step analysis of all components will help determine the most reliable foundation for the construction of a particular bath.
Most often, they use a tape shallow foundation for a 4x6 bath. However, this is far from the only option. You can also apply:
- pile-screw - they are built when the construction site has strong elevation differences;
- columnar - suitable for stable soils, on which there are no landslides and shifts;
- pile-grillage- applicable for unstable soils prone to shifts and shedding;
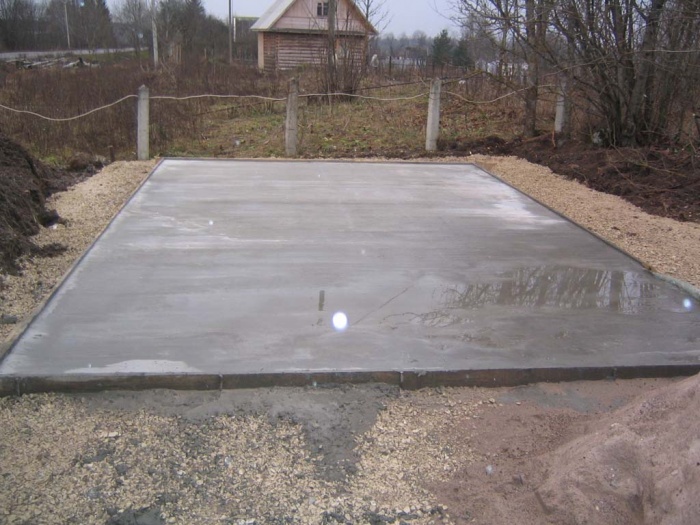
- monolithic - versatile, is the most reliable, but at the same time, and the most expensive in terms of cost. A solid slab of concrete evenly distributes the loads from the bath, the soil does not sag, and the building does not deform or crack.
All are used for the construction of baths, but most often, nevertheless, they use columnar or tape types of base - they will be discussed in more detail about them.
How to arrange a columnar foundation for a bath
It is quite possible to make a columnar foundation for a 6x4 bath with your own hands. Such a base is especially suitable for lightweight buildings made of timber, logs, foam or aerated concrete.

Attention! The foundation of wooden logs or timber must not only be thoroughly waterproofed, but also treated with an antiseptic agent to prevent decay.
The posts can be constructed from the following materials:
- bricks;
- concrete poured into prepared formwork;
- asbestos-cement pipe;
- metal pipe;
- solid concrete slabs;
- wooden logs or beams.

Advice! From whatever material the columns for the foundation are constructed, they must be carefully waterproofed. For this, roofing material or bituminous mastic is used.
More often than others, pipes are used for a columnar base: metal or asbestos-cement. The description of the installation process looks like this:

Attention! The cost of a column foundation is much lower than the construction of a strip foundation. And the strength of such a foundation is quite enough for a small bathhouse made of wood or other lightweight material.
Construction of a belt-type foundation
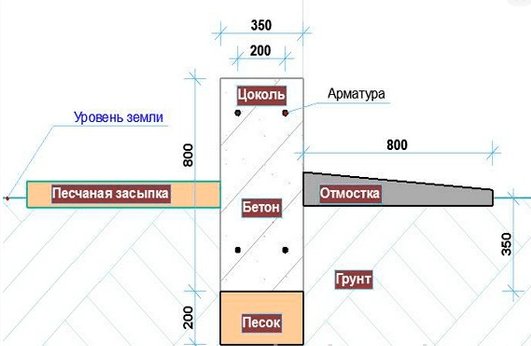
For small buildings, such as a garage, a summer kitchen, a bathhouse, you can arrange a shallow strip foundation. In order to calculate the depth of the trench for such a foundation, it is necessary to study the composition of the soil at the site.

If the soil is stable - not crumbly, moderately moist - a trench about 40 cm deep will be enough.For more unstable soils - chernozem, peat, sandy - this value should be increased to 70-80 cm.
The width of the foundation depends on the material of the walls of the bath: for light structures, 25 cm will be enough, and for stone or brick walls at least 35 cm is needed.The trench itself, at the same time, should be even wider - about 5 cm.
A step-by-step description of the process of laying a strip foundation for a bath looks like this:

Attention! For the construction of the foundation on the street, there must be a positive temperature - optimally up to +5. If it is too cold, the concrete will harden unevenly and become brittle.
When building a concrete foundation, it is important to remember that any air bubbles in the thickness of the solution will sooner or later lead to the destruction of the material. Therefore, concrete can be poured from a height of no more than 50 cm, and after pouring it can be tamped with a vibrating machine or, at least, pierced the solution with a rod in several places.
Any building, even a small one, requires a reliable and solid foundation. A properly selected and well-built foundation ensures the durability and stability of the structure.
Rules for choosing a foundation for a bath
When choosing a foundation for a bath, three factors are taken into account:
- The mass and dimensions of the structure.
- Features of the soil at the construction site, namely, its bearing characteristics, the depth of the groundwater, the level of freezing and the terrain.
- Material opportunities.
The strip foundation for a bath can be called the best option. It can be laid to any depth: it is used on a stable ground (its sole is located at a depth of at least 80 cm), on heaving and prone to movement soils, a deep foundation is erected (0.3 meters below the freezing level of the soil). In areas where there is a slope, perform. The only drawback of this type of foundation is serious material costs.
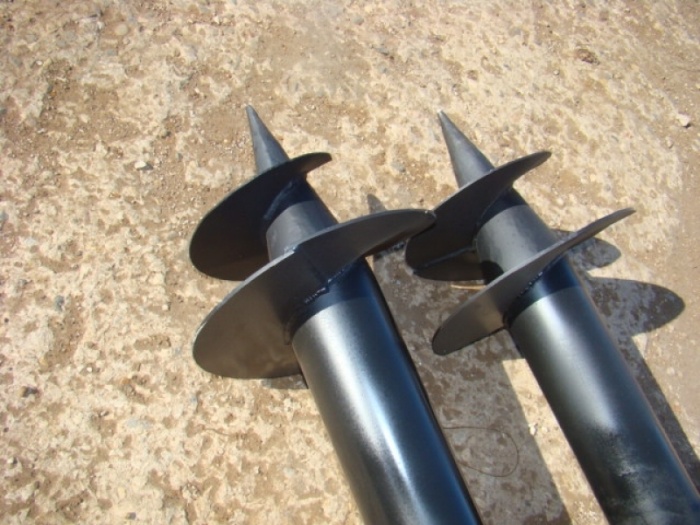
A screw-pile foundation involves the use of steel piles, which with their blades cut into the ground and rest on solid layers located at great depths. Among the main advantages are the short installation time and reasonable cost. In addition, such a foundation is characterized by increased strength and stability.
For a bath of light weight and size, a support-column foundation can be erected. In particular, this applies to log cabins and structures made of frame panels, the area of which can be 3 * 3 or 6 * 6 meters. Asbestos-cement pipes can be used as supports (we previously wrote in detail about that), inside which a concrete solution is poured for greater strength. You can also build. The disadvantage of this option is poor stability on soil prone to horizontal shifts; in this case, overturning of the supports is not excluded.
Moving, heaving and low-density soils require a more complex and reliable base for the bath. As one of the options, you can use a foundation slab, which is a monolithic reinforced concrete structure up to half a meter high. The width and length of the slab is determined by the dimensions of the main structure. The slab base can be called the most reliable and durable option, but the costs for its construction are quite large.
Rules for marking the foundation for a bath
The foundation for the bath is a very important part of the structure, therefore, it is necessary to responsibly approach the marking of the site for construction.
There are basic marking rules for all types of foundations:

- The base of any type of foundation for a bath, with the exception of structures with round walls, must have strictly right angles. They can be made using special geodetic instruments. However, a simple home craftsman may not have such devices, so an ordinary tape measure and a non-stretching construction cord or rope will come to the rescue.
- Having determined the approximate location of the corners on the site, a peg is placed in one of them, from which two cords are pulled: in one direction 3 meters long, in the other side 4 meters. To avoid deviations in degrees, it is necessary to accurately maintain the specified dimensions. To obtain a right angle between the cords, it is necessary that the distance between points 3 and 4 corresponds to 5 meters.
- After setting all the corners, it is imperative to check the diagonals, which must have strictly the same length. In this case, deviations of no more than 2-3 mm are allowed.
Layout for piles or poles
The threads stretched when the corners were set formed the outer perimeter of the foundation. It is along this line that the supports should be placed. As for the distance, it all depends on the size of the bath and its weight. Most often, a step of 1.5-2 meters is maintained between the supports. The main thing is that the pillars or piles are located in the corners of the structure, at the intersections of the walls and in the center of the bearing walls and partitions. With a large wall length, additional supports are placed.
When drilling wells, the thread defining the perimeter of the foundation can be removed, and pegs can be installed at the locations of the supports.
At the end of the excavation work, the perimeter diagonals and the location of the wells should be checked. There should be no deviations from the perimeter and main indicators.
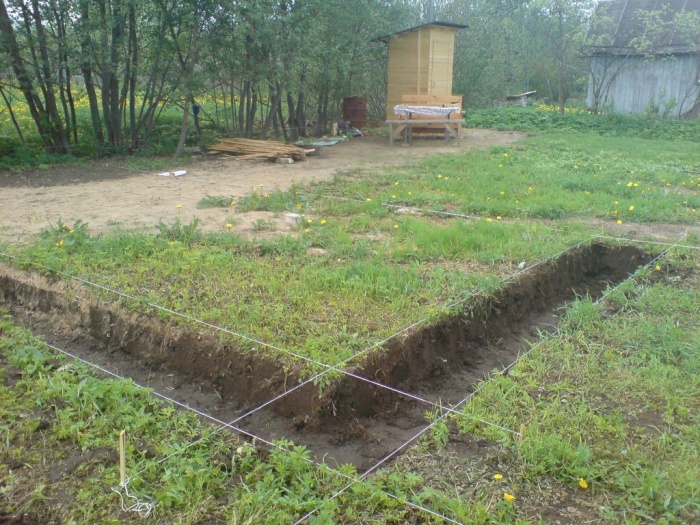
Marking for tape base
It is necessary to mark the site for the construction of the strip foundation according to special rules. In particular, in addition to the outer perimeter, the inner perimeter should be answered. Its boundaries will determine the width of the trench for the concrete tape. The stretch is performed, slightly stepping back from the perimeter line in order to expose the pegs outside the working area. In this case, they will not interfere with construction work.
In general, the marking is carried out by analogy with a columnar base: under each load-bearing wall or partition, a foundation tape must pass. When marking for a concrete tape, do not forget about the sewage system. It is necessary to mark the places where the pipe passage will be arranged. At the same stage, marks are made of the location of the ventilation holes in the foundation.
If the bath project provides for the construction of a stove, then it is also necessary to make a solid foundation of monolithic concrete for it.

Correctly made markings will help to build a solid and reliable base for the bath.
As mentioned above, the bath can be built on any foundation, but the most popular is the columnar base and the foundation in the form of a concrete tape. Therefore, these options need to be considered in more detail.
Column foundation for a bath with your own hands
This version of the foundation is used for buildings made of timber, logs, foam blocks or aerated concrete blocks. The following materials can be used as supports:
- Brick.
- Concrete poured with pre-exposed formwork.
- Asbestos-cement pipes, inside which a concrete solution is poured for strength.
- Metal pipes.
- FBS blocks.
- Wooden beams or logs.
When using wooden supports, they should be pre-treated with antiseptic compounds, which prevent the process of decay, and waterproofed. It should be noted that waterproofing must be carried out for all materials used as support structures. For this purpose, bitumen-based mastics are most often used or.
In most cases, the supports for the columnar base are made of metal or asbestos-cement pipes. Their installation is carried out as follows:
- In accordance with the markings made, wells are drilled in the ground, the diameter of which exceeds the pipe cross-section by 3-5 cm.The depth of the well under the support for the bath can be from 50 to 70 cm.
- Sand and fine gravel are poured into the bottom of each depression; the thickness of such a cushion should be about a third of the height of the well. The sand is abundantly moistened with water and compacted well. The crushed stone layer is also compacted.
- Pipes are placed in the prepared wells, having previously wrapped them with sheets of roofing material or coated with mastic.
- The support is leveled and the space between the borehole wall and the pipe is filled with sand or soil. After filling, the level is checked again.
- Further, concrete solution is poured into the pipe by about 2/3 and it is raised, passing part of the solution under the base of the pipe.
- The support is reinforced. For this, metal rods are inserted into the concrete.
- The pipe is poured to the upper level with a solution and left to solidify completely.
Arrangement of the foundation in the form of a concrete tape
One of the traditional options can be called a strip foundation for a bath. Its construction is carried out in accordance with the following technology:
- Determine the depth of the foundation, taking as a basis the features of the soil at the site. If the soil is stable, then the base of the foundation is placed at a depth of 40 cm.Moving soils, in which peat, black earth or sand predominate, require greater depth bookmarks. In this case, the value increases to 80 cm.
- The width of the trench is determined by the material that will be used to build the walls of the bath. Most often, wooden walls and frame panels are about 25 cm thick, and walls made of brick or stone are 35 cm.The width of the trench itself should be about 5 cm larger than these values.
- Marking is carried out according to the scheme proposed above and begins to dig a trench. On loose soils, its shape should look like an inverted trapezoid. The bottom of the trench is carefully leveled using a building level.
- Further, they equip at the bottom in order to reduce the impact of the soil during seasonal movements. First, a layer of sand is poured, moistened and tamped. Then crushed stone is poured and also carefully tamped. Layers should be alternated until the pad is halfway up the trench.
- The next step will be the construction of the formwork. To do this, you can use wooden planks, which must be knocked together into shields of the appropriate size. It should be remembered that the inner surface of the formwork should be as flat as possible.
- The inner walls of the formwork and the bottom of the trench are covered with plastic wrap or roofing felt so that moisture does not penetrate into the concrete mass.
- A frame made of reinforcing rods tied with wire is laid in the resulting structure. It should be installed on special substrates so as not to damage the waterproofing material.
- Concrete is poured. The process must be one-off to prevent the concrete from stratifying and further deteriorating.
- The finished foundation is left for about a week, after which the formwork is dismantled.
- It is possible to proceed with the further construction of the bath only in a month, during which time the concrete will gain the necessary strength.
The laying of the foundation for the bath can be done by hand, in this case you can save a lot of money. The main condition is to follow all the instructions and recommendations of experienced craftsmen.
Arrangement of the foundation is one of the first and most important stages of construction work. Any building needs its own foundation, be it a light shed made of boards, a compact bathhouse, a small frame house or a huge private mansion made of stone materials.
Among all the existing types of support structures, the most popular are strip foundations: they are suitable for use in a wide variety of conditions, are distinguished by the relative simplicity of arrangement and, in general, conscientiously cope with all the tasks assigned to them.
File for download: SNiP 3.02.01-87 EARTH FACILITIES, BASES AND FOUNDATIONS
After reading the information below, you will get a complete picture of the existing types of strip foundations and their areas of application, the requirements for such structures, study theoretical aspects for each key stage in the construction of such a support and a step-by-step practical instruction with illustrations.
- erection of relatively light (frame, log) and heavy (cinder block, brick, concrete, stone, etc.) buildings;
- construction of buildings with a basement, underground garage and other similar premises;
- construction of baths and houses with attic floors;
- performing construction work on sites with heterogeneous soil.
The base in question is almost completely universal - it will not be possible to equip a concrete tape unless on a peat bog or subsiding soil. Be sure to consider this moment when independently arranging the supporting structure and familiarize yourself with the key requirements for strip foundations.
File for download: SNiP 2.02.01-83. Foundations of buildings and structures
Basic requirements for strip foundations
The main characteristic of the strip foundation is the depth of its occurrence. When choosing suitable value it takes into account, firstly, the nature of the soil at the construction site, and secondly, the type of building, for the construction of which a concrete support is equipped. Information regarding these points is shown in the following table.
Table 1. The required depth of the strip foundation for the bath, cm
| Building under construction | Stony soil | Dense clay and loamy soils | Sandstone consisting of packed dry sand | Silty soils, soft sandstones | Very soft sandstones, silty soils, sandy loam | Peat soils |
|---|---|---|---|---|---|---|
| Compact one-story sauna | 20 | 30 | 40 | 45 | 65 | |
| House-bath with an attic | 30 | 35 | 60 | 65 | 85 | Strip foundation is not used |
The table shows averaged values. In general, it is better to specify the required depth of the strip foundation on an individual basis, fully assessing the features of the climate in the place of construction work and the characteristics of the site itself (type of soil, depth of passage groundwater etc.).
Types of strip foundations
Currently, there are many varieties of strip foundations. They are used in the performance of various construction works and have a number of structural differences, but they are generally erected using a similar technology.
The simplest type of support under consideration is tape monolithic belt.

The design is used mainly in areas with a high groundwater level for the construction of small light buildings. Well suited for a compact frame bath, for example, 3x3 or 4x4, which does not create a significant load on the base.
The second type is unburied strip foundation. In fact, it is the same monolithic tape belt, only the concrete part of the structure itself is put on the edge here.

This type of foundation is characterized by an increased high bending strength, which makes it possible to put on a support structures that are more serious in their characteristics, for example, from a rounded log.
Important! No stone buildings should be placed on a monolithic belt and a shallow foundation.
The third type of supports under consideration is shallow strip foundation.

The structure is used mainly in areas where the groundwater level passes at a depth of more than 1 m. Approximately half of the height of the concrete part is buried in the ground. If the groundwater passes above the mentioned mark, there will be no sense in arranging a shallow tape: in this case, drainage will have to be done, which is fraught with additional labor, financial and time costs.
The fourth type is.
The first ribbon lies on its side here, the second one is on the edge. Such a bundle forms a very rigid structure. Stone houses can be placed on such a foundation. There is usually no sense in using a T-shaped foundation when building a small private bath. The recommended deepening is from 1 m. An important condition for arranging such a support structure is the absence of ground water throughout the entire depth of the tape, because under the pressure of the liquid, the foundation is deformed and destroyed, which will make the operation of the structure installed on top impossible.
The fifth type of the considered base is tape recessed foundation.

The minimum depth is 1.5 m. The specific value is determined by the depth of freezing of the soil - the base of the concrete structure must be below the mentioned indicator.
| Regions | The depth of soil freezing, cm |
|---|---|
| Vorkuta, Surgut, Nizhnevartovsk, Salekhard | 240 |
| Omsk, Novosibirsk | 220 |
| Tobolsk, Petropavlovsk | 210 |
| Kurgan, Kostanay | 200 |
| Yekaterinburg, Chelyabinsk, Perm | 190 |
| Syktyvkar, Ufa, Aktyubinsk, Orenburg | 180 |
| Kirov, Izhevsk, Kazan, Ulyanovsk | 170 |
| Samara, Uralsk | 160 |
| Vologda, Kostroma, Penza, Saratov | 150 |
| Voronezh, Perm, Moscow, St. Petersburg, Novgorod, Ryazan, Tambov, Tula, Yaroslavl | 140 |
| Volgograd, Kursk, Smolensk | 120 |
| Pskov, Astrakhan | 110 |
| Belgorod, Kursk, Kaliningrad | 100 |
| Rostov | 90 |
| Krasnodar | 80 |
| Nalchik, Stavropol | 60 |
Video - Types of strip foundations
Theoretical aspects of self-arrangement of a strip foundation
Before proceeding with the consideration of the step-by-step technology of self-pouring the foundation for the bath, you are advised to study in detail the theoretical aspects, key requirements and related comments regarding the conduct of each stage of the upcoming work.
After determining the suitable parameters of the strip foundation in accordance with the conditions of a particular construction event (information on this matter was given in the table and on the diagrams of existing types of support), they begin to mark the site, having previously cleaned it of debris and, in general, everything that may interfere with the implementation of further work ...
In addition to debris, the top ball of soil is removed to a depth of about 12-15 cm. The markings are generally carried out in the traditional way: wooden or metal pegs are driven in the corners of the future structure and a rope is pulled between them. The latter will make it easier
navigate when determining the direction of the foundation strip.
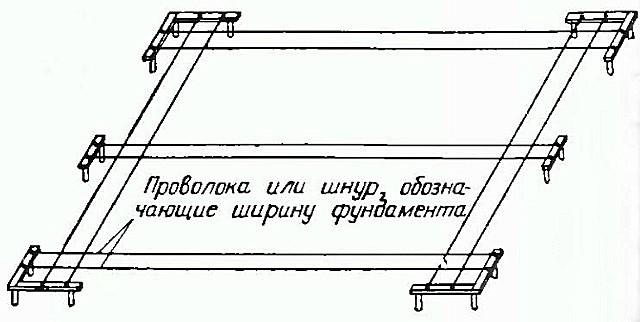
A very convenient option is to perform markup using cast-off. An example of marking using such devices is shown in the following image.
The markup begins by marking the outer contour of the base. In this example, a foundation for a bath with dimensions of 5x6 m is marked. On all sides, the area for arranging the base should be at least 40-50 cm wider than the supporting structure itself.
Specifically in this example, the dimensions of the marked area were 6.6x7.6 m. The calculation is carried out according to the Pythagorean theorem, according to which the square of the hypotenuse is equal to the sum of the squares of the legs. The hypotenuse (AC) for this example is calculated as follows: √ (5600² + 6600²). The result is a value equal to 8656 mm.
We draw a baseline equal to one of the sides of the future foundation. In this example, the segment AD equal to 5600 mm is defined as the base one. Most often, when performing this event, the most important side future construction - it is made parallel to a certain direction, for example, the line of another building, a fence, etc. For example, we define as an important AB line, equipped in parallel
in relation to the house at a distance of 5 m from it. We move the corner point A 2 m away from the fence. From point A, set aside the segment AD and drive in pegs or reinforcement at its extreme points.
To locate point B, we need a pair of ropes. We make loops at the ends of each rope. We throw the first loop on the peg / rod, equipped at the location of point D. We use such ropes along the length so that after tensioning them between the axes of the driven pegs, values equal to the previously mentioned 6600 mm and 8656 mm are provided, in accordance with the above drawing.
After pulling the rope, draw arcs on the ground. First we draw an arc with a radius of 6600 mm from point A, the second - 8656 mm from point D. At the intersection of the drawn arcs, point B. Here we need to drive in the second peg / rod.
To determine point C, we use the same technology. The only difference is that from point A an arc is drawn along the length of the diagonal, from point D - along the side of the rectangle. We measure the diagonals of the resulting rectangle. Ideally, they should be the same length. The maximum permissible deviation is 1-1.5 cm. We pull the rope for marking, stepping back from the ground about 20-25 cm, successively bypassing each bar / rod. With such a height of the cord tension, it will not interfere with the installation of the strips.
To determine the remaining external nodal points, we simply measure the segments, or we use the above technology in accordance with the foundation drawing, guided by the ropes. The inner contour, as well as the nodal points of the load-bearing walls, are marked after the construction of the raffle.

Let's start installing the castoff. It will provide a temporary marking of the axes outside the trench and allow you to control the zero level of the structure. In addition, the presence of rags makes all the preparatory activities easier and more convenient.
The installation of the strip is carried out around the entire perimeter around the supporting structure. A distance of about 1-1.5 m is maintained between each side of the perimeter and the rags to be installed, so that there are no inconveniences in the process of excavation.
We find the highest corner point of our site, for example, A. Here the first cast-off will be installed. We take three beams (10x10 cm enough) and drive them into the ground in accordance with the drawing. It is important to ensure the most reliable fixation of the posts. Using a pencil or other suitable device, we mark the zero level of the future bath on the post. To do this, we retreat 60 cm up from the ground and draw a line indicating the zero level.
Armed with a screwdriver and a level, we fix a pair of 4x15 cm boards on the hammered posts. It is important that the upper edges of the fixed boards strictly coincide with the previously applied zero level and are located in a single horizontal plane. In a similar order, we mount posts and boards in each corner and along the length of the perimeter. We transfer the zero level to each installed column, focusing on the zero level of the very first castoff. Finally, we make sure that the upper edges of the fixed boards are located in a single horizontal plane. For this we use a level.
Let's proceed to the final markup. First, we alternately pull the ropes along the outer contour. To do this, we put the rope on the upper edges of the oppositely located strip and pull it, orienting it strictly along the rope of the lower contour. After the final alignment, we drive nails into the boards and tie the cords with high quality. Using the same scheme, we mark the entire outer contour. As a result, the upper contour should coincide with the lower one. We are convinced of the equality of our diagonals. In the absence of deviations, we stretch the remaining ropes along the extreme edges of the walls of the supporting structure being erected. We mark on the rags the required wall thickness and the width of the gaps between them, drive in nails, pull and tie the ropes.


Execution of marking of external and internal walls of the building. Scheme

At the same stage, you can mark the foundation for sauna stove... In accordance with the requirements of building technology, there should not be a rigid connection between the supports of the furnace and the main building. Having coped with the markings, proceed with earthworks.
Digging a trench
In accordance with the markings, a trench is dug to a predetermined depth - recommendations on this matter were given earlier.

Digging a trench

start digging from the bottom corner of the support structure - this way you will achieve the same depth of the pit along its entire length;
try to keep the walls of the trench as vertical and even as possible. Install temporary supports in places of soil crumbling;
regularly check the depth of the pit and the indicators of the slope of its bottom for the absence of drops.
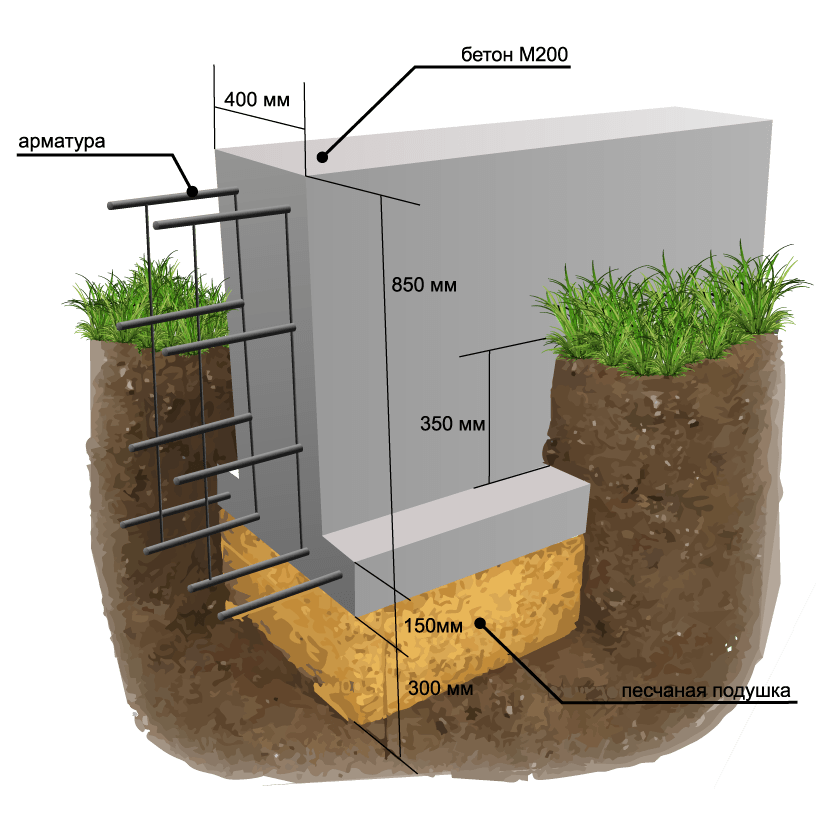
Having dug a pit, proceed to the arrangement of the backfill. The thickness of the sand cushion is from 15-20 cm. The backfill is spilled with water and carefully compacted. Thanks to this structural element, the correct distribution of loads from the future structure to the supporting structure will be ensured. The type of backfill as part of the structure is shown in the following image.

Important! The filling is done in several layers. The recommended thickness of each layer is 5 cm.
A layer of roofing material is laid on the finished sand pillow. The material will protect the backfill from erosion and prevent the concrete mixture from seeping into the sand during the pouring of the foundation.

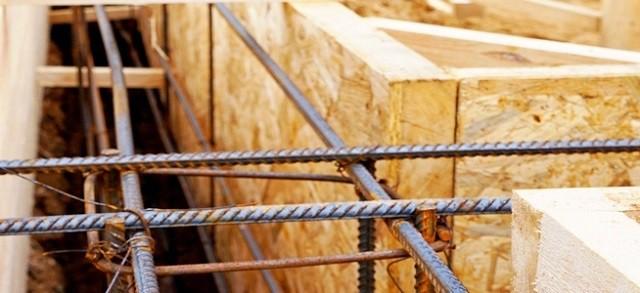
In the photo - roofing felt under reinforcement
Additionally, roofing material will take over the functions of waterproofing the lower part of the supporting structure. For greater efficiency, the insulating material should be wrapped around the walls of the pit about 15-20 cm.
Formwork installation is one of the most important stages of the work under consideration.

The structure can be collapsible (dismantled 3-10 days after the concrete is poured) or non-removable (remains part of the foundation, providing additional insulation).
For the manufacture of collapsible formwork, wooden boards are used. Individual elements are twisted with screws into panels of the required dimensions. The finished panels are vertically installed in the trench. The height of the aboveground basement directly depends on the height of the formwork protrusion above the ground surface. As a rule, they adhere to the indicator from 35-40 cm.

The fastening of individual shields is carried out along their crossbars. From the outside, the elements are propped up with pieces of timber. Be sure to check that the upper part of the formwork is in the same horizontal plane, i.e. there were no differences in height, otherwise the foundation will also turn out to be uneven.
A dense polyethylene film is laid into the finished formwork, covering the structure from the inside. Attach the polyethylene to the end sides of the formwork panels.

For assembly fixed formwork polystyrene foam blocks are used. Elements are stacked on top of each other. The fastening of the individual blocks is carried out by means of toothed cutouts and grooves. Blocks of different sizes are available for sale, which allows you to choose them for any foundation.

The blocks do not need additional fastening. Spacers are also not needed.
Reinforcement
Reinforcement is carried out using steel rods with a diameter of 8-15 mm, depending on the expected load that will be created by the future bath, the size of the foundation and the key characteristics of the soil.
The reinforcement is cut into rods along the length of the walls and tied into a net using a special wire. It is strongly discouraged to use welding for this - during the shrinkage of the structure, the reinforcing mesh may collapse.
At the request of the owner, the rods can be fastened with special plastic clips (clamps) - this is an easier and faster option.


Fill
It is better if the concrete is poured in one go, however, in the conditions of independent construction, it is often extremely problematic to prepare the required amount of the mixture at once.

In view of this, concrete will have to either be ordered ready-made, or look for other options for solving the problem, pouring the solution in layers. The standard scheme is as follows: on the first day, a horizontal layer of 15-20 centimeters thick is poured and carefully compacted with a wooden beam. It is important that the thickness of the layer along the entire length of the formwork is the same, and the top of the fill is even. The next day, the work is done in the same way. The process will be repeated until the formwork is completely filled with concrete.
The sealed structure is covered with plastic wrap - this will prevent it from drying out too quickly and cracking. Periodically, the plastic film is removed, the concrete is spilled with water from a hose, and then again covered with insulating material. The substrate will dry for 4-5 weeks. The formwork is dismantled on average 5-7 days after pouring, sometimes after 10 days. Finally, the finished structure is waterproofed. This point will be discussed in more detail later.
In order for the finished foundation to be of the highest quality, carry out the work on its arrangement in compliance with the key building recommendations.
Firstly, in the case of self-preparation of the solution, use materials cleared of clay, soil and other impurities for this.
Secondly, choose the right proportions of the solution specifically for your case. In general, crushed stone / gravel is always taken approximately 1.5-2 times more than fine aggregate, i.e. sand. detailed information in relation to possible concrete compositions will be given in the practical part.
Thirdly, add the optimal amount of water to the solution - about half of the weight of the cement. Also consider the moisture content of the raw materials. For example, if you are forced to use wet sand, the amount of water required will be reduced accordingly.
Fourth, do not forget to process the fill to remove excess air from it - this is important for thick solutions. It is enough to pierce the filling with a metal rod along its entire length.
Fifth, after pouring the concrete, the formwork must be tapped with a wooden hammer - this will also remove excess air.
Practical aspects, or step-by-step instructions for pouring the foundation
For example, consider the procedure for arranging an unburied strip foundation - one of the most popular options, perfect for structures of a relatively small area. For example, your wooden sauna 4x4 or 6x6 in size (sometimes even larger) will feel quite comfortable on such a basis. If necessary, you can change the depth of the tape and its other parameters in accordance with the type of soil and the characteristics of the building being built - the procedure itself will remain the same.
The order of the event in question is shown in the following table.
Table 2. The order of arrangement of an unburied foundation
| Stage of work | Illustration and additional explanations |
|---|---|
| We cleanse a site for the future foundation from debris. |
|
| We recycle the collected rubbish. TO for example, you can take it out to a landfill or just burn it. |
|
| Getting started preparing the markings for the trench |
The marking is done in a standard way: a cord is pulled along the perimeter of the future structure, pegs are driven in the corners
Using the hydro level, we put points on the horizontal plane on the pegs. |
| Digging a trench in accordance with markup. The minimum permissible depth is 60 cm. |
We cover the bottom of the finished trench with geotextile, roofing felt or plastic wrap for waterproofing. |
| For this we use a sand and gravel mixture. The recommended layer thickness is 15-20 cm. Thoroughly spill the backfill with water and tamp it well
You can tamp it manually. Align the top of the finished backfill horizontally. |
|
The width of each should correspond to the height of the foundation being built. In the example under consideration, a foundation with a width of 300 mm and a height of 400 mm is equipped. |
|
We start from the inside. To make the formwork easier to disassemble in the future, we use screws to connect the elements. |
|
Thanks to the reinforcement, the required stiffness indicators of the finished foundation will be provided. Rebar rods are connected using knitting wire. The crochet hook, if desired, can be bent from the old screwdrivers. First, the nets are knitted. After that, the finished meshes are connected into boxes.
The sizes of the cells are usually kept at the level of 10x10 or 15x15 cm. The finished boxes are installed at each formwork wall, and then they are tied into a single structure using the already known technology. Additional reinforcing reinforcement is mounted at the joints.
|
|
|
|
| Pouring concrete | To do this, we use a ready-made composition of the brand from M200, or we prepare the solution ourselves (the proportions are indicated in the table below). We fill the space in the formwork with a uniform horizontal layer of concrete and carefully tamp it, you can manually.
In the image you can see that the walls of the foundation are on different levels- this option is very convenient in the case of building a bath from a log. This feature will allow the first crown to be laid as efficiently as possible in the future. Select the size of the drop in accordance with the dimensions of the logs used. When building a foundation from other materials, you don't have to make such a difference - there is no point in this. The technology for performing the work remains the same.
|
| In order for all the cement to react and the hardened concrete to be as strong as possible, periodically spill the fill with water, and then cover it with polyethylene or roofing material |
|
| The formwork is usually dismantled 5-7 days after pouring, but depending on the condition of the concrete, this period can increase to 10 days. Further construction work can be started at least a month after the foundation is poured. |
|


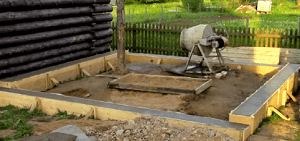


Table 3. Concrete proportions
| Cement grade | Concrete M300 (V 22.5) | Concrete М250 (В20) | M200 (B15) | M150 (B10) | M100 (B7.5) |
|---|---|---|---|---|---|
| 400 | 1:1,6:3,4 | 1:1,8:3,6 | 1:2,4:4,4 | 1:3:5,3 | 1:4:6,5 |
| 500 | 1:1,8:3,9 | 1:2:4 | 1:2,6:5 | 1:3,5:6 | 1:4,5:7,3 |
Video - How to properly fill the foundation for a bath
A completely solidified foundation that has gained strength is subject to mandatory waterproofing. Most often, roofing material is used for this. The material is laid on the upper part of the foundation, previously cleaned of debris and, at the request of the owner, covered with an acrylic primer. After cleaning and priming (if planned), the top of the foundation is covered with mastic.

The first layer of roofing material is laid on top, pressed and at the same time smoothed.

Video - Foundation waterproofing